Configure Web Application
This page outlines configuring a Web Application object. The settings that you save here will be available on every pentest that you later run against this application.
Application Inventory Page
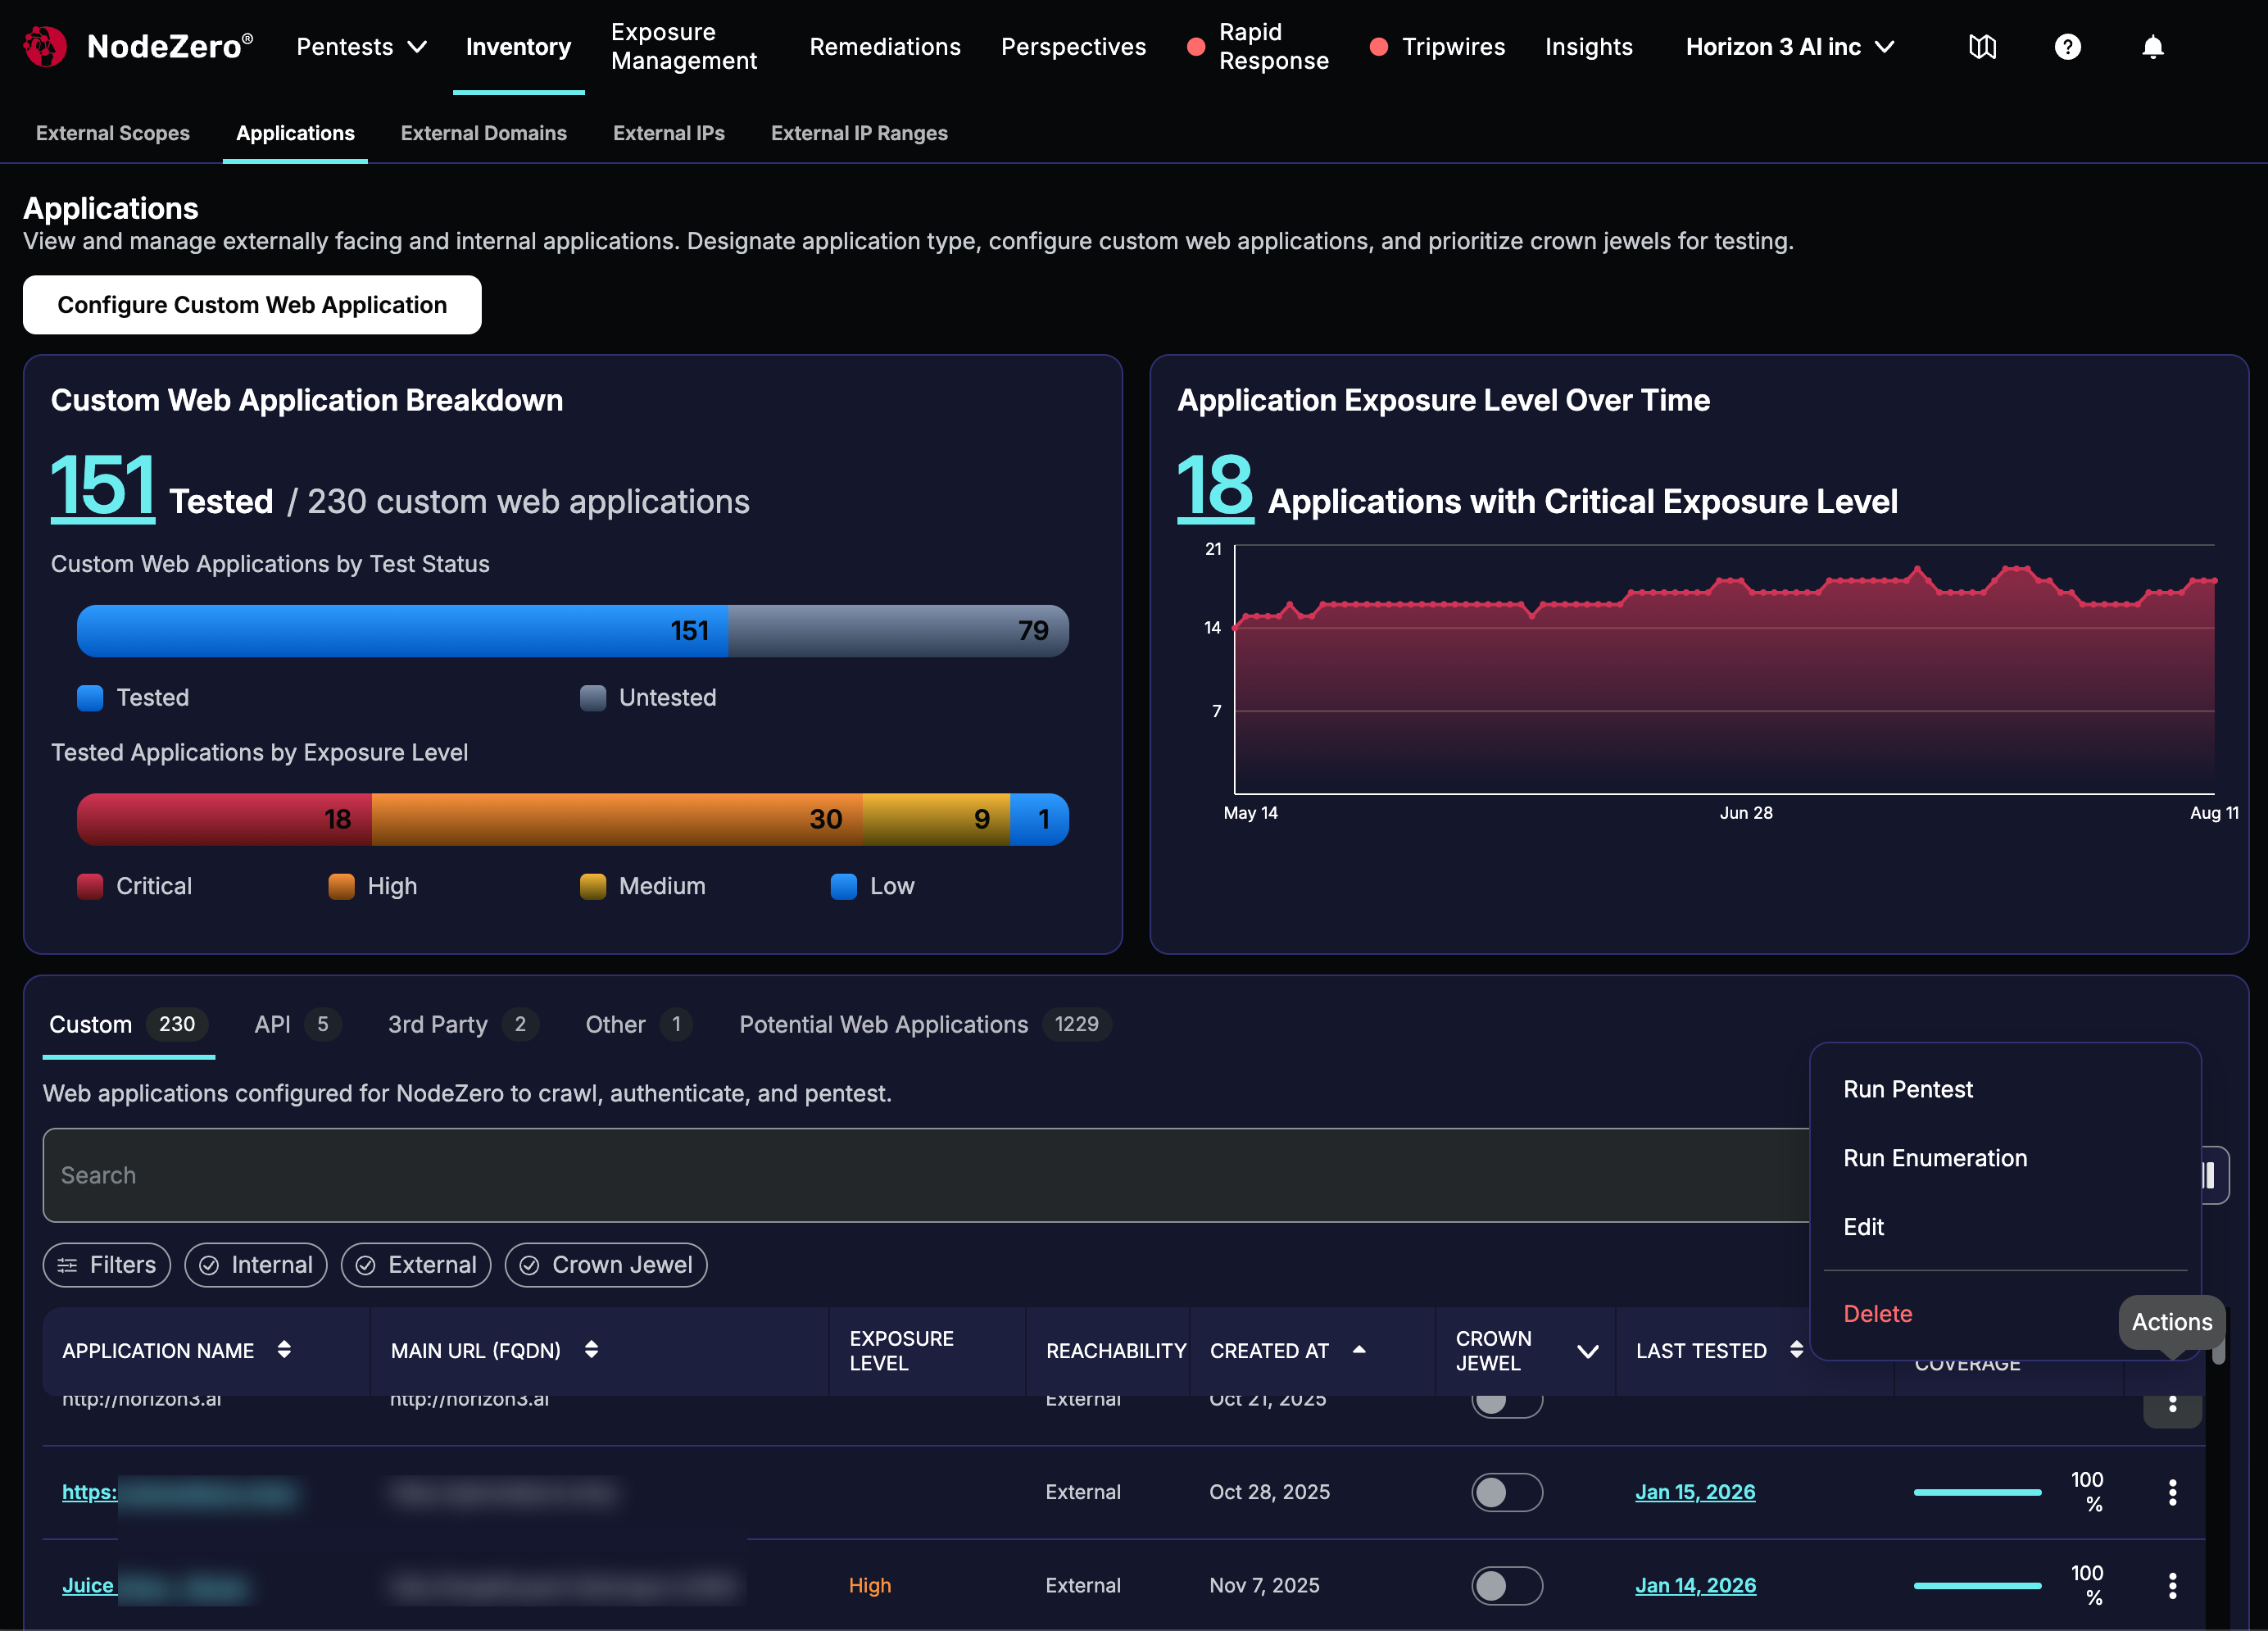
To reach your NodeZero Portal's central point for managing WebApp configurations, test runs, and test results, select Inventory > Applications > Custom. (Currently, WebApp tests can be run only against applications on the Custom lower tab.)
Click on a web application's name to see findings, tested endpoint coverage, and route-level detail across all pentests run against it. Click an individual Last Tested link to understand what was reached and tested during a pentest, and where coverage gaps remain. You can apply multiple filtering and search options here.
Potential Web Applications
The Inventory > Applications page's Potential Web Applications lower tab lists applications that NodeZero has discovered through prior pentests (internal, external, etc.) against your environment. To confirm any of these as a web application: Click its Designate link, select Custom in the resulting modal, then click Apply Designation. This moves the app to the Custom tab, where you can apply all the options outlined on this page.
Configure a New or Existing Application
To begin defining a new application from Inventory > Applications > Custom, click Configure Custom Web Application (the large upper-left button shown above).
Or, to edit an existing application, open its Actions () menu and select the Edit option shown above.
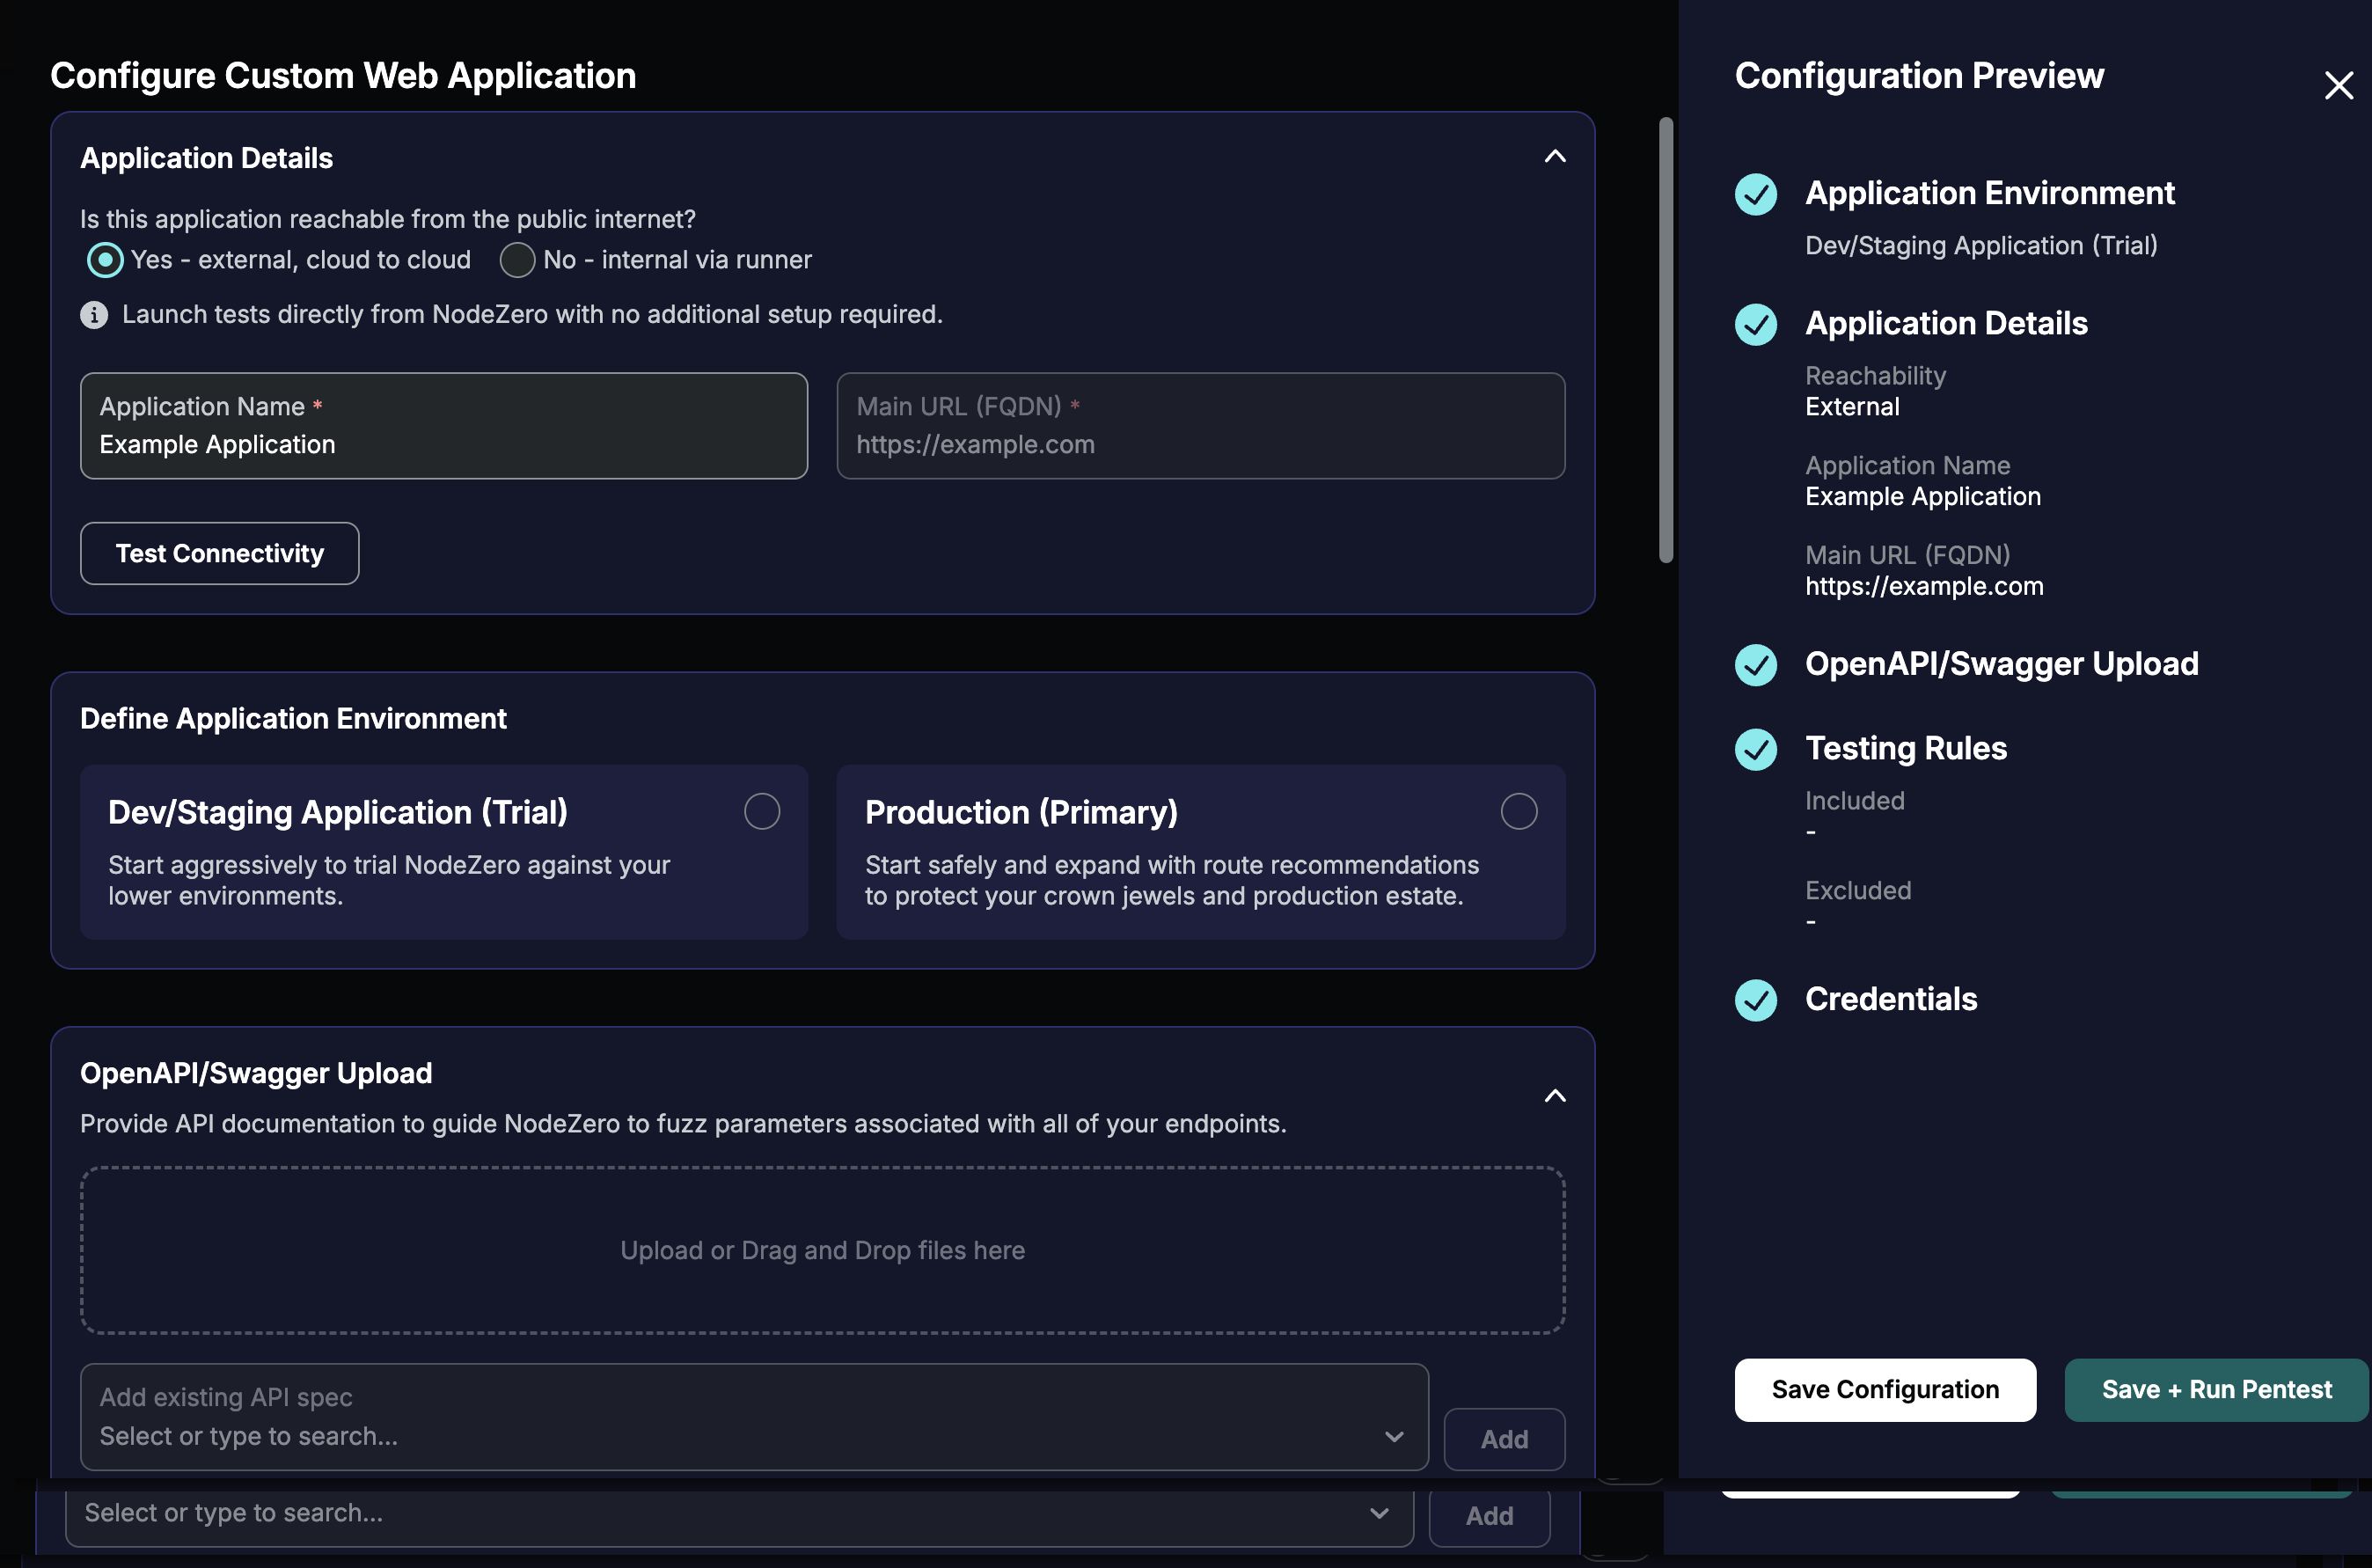
Either option will open a configuration page like this:
Top-to-bottom configuration
This configuration page is designed to be filled out from top to bottom, starting with the Application Details > Name and Main URL. Your selection at each stage enables NodeZero pre-populate lower controls, such as inserting proposed Testing Rules appropriate to the Dev/Staging versus Production Environment you specify. Controls lower on the page are locked out until you respond to prerequisites higher up.
Scoping Your Target
Each web application is defined by the following fields:
-
Name – A label for the application in your inventory
-
Main URL – The primary entry point NodeZero uses to start crawling and testing. Enter a fully qualified domain name (FQDN). By default, subdomains will be out of scope, but you can add these later when reviewing test results. Click Test Connectivity to verify reachability before you save the application's config.
-
Access Type – Select Yes - external, cloud to cloud for publicly reachable applications; or select No - internal via runner for applications behind a private network or VPN.
-
Application Environment – Select Dev/Staging/Trial for non-production environments or first-time evaluation; this will pre-populate aggressive Testing Rules below, containing all available HTTP methods. Select Production for live applications; this will pre-populate only read-only methods below. These selections do not determine which routes are tested, and you can override and customize the testing rules applied to either scenario.
-
OpenAPI/Swagger Upload – Optionally, here you can upload an endpoints specification in OpenAPI/Swagger format (YAML or JSON file) to seed route discovery with endpoints that might not be linked in the application UI.
Group alternate URLs under one web application only when they belong to the same application and share the same testing scope.
External Versus Internal Application
At the prompt Is this application reachable from the public internet?: Applications behind a VPN or other private network require the No - internal via Runner access type here. When you run WebApp Internal tests, you'll need to select a NodeZero Runner that can reach the target application. The Runner must also retain internet access so that NodeZero can communicate with the platform and can function correctly.
WebApp Internal tests also require outbound access to AWS Bedrock endpoints. This is preconfigured for NodeZero Portals based in Australia. For US and EU endpoints to allowlist, see Requirements by Portal Region.
Testing Rules
Testing rules control which routes and HTTP methods NodeZero tests. Certain rules are included by default, and at least one rule must be included in order for NodeZero to attack discovered routes.
You can use the quick-add presets outlined below to populate rules.
Available rules and methods
Add buttons are disabled where a method category is already fully populated in the Includes list, or where you have not yet entered or selected prerequisites further up the page.
-
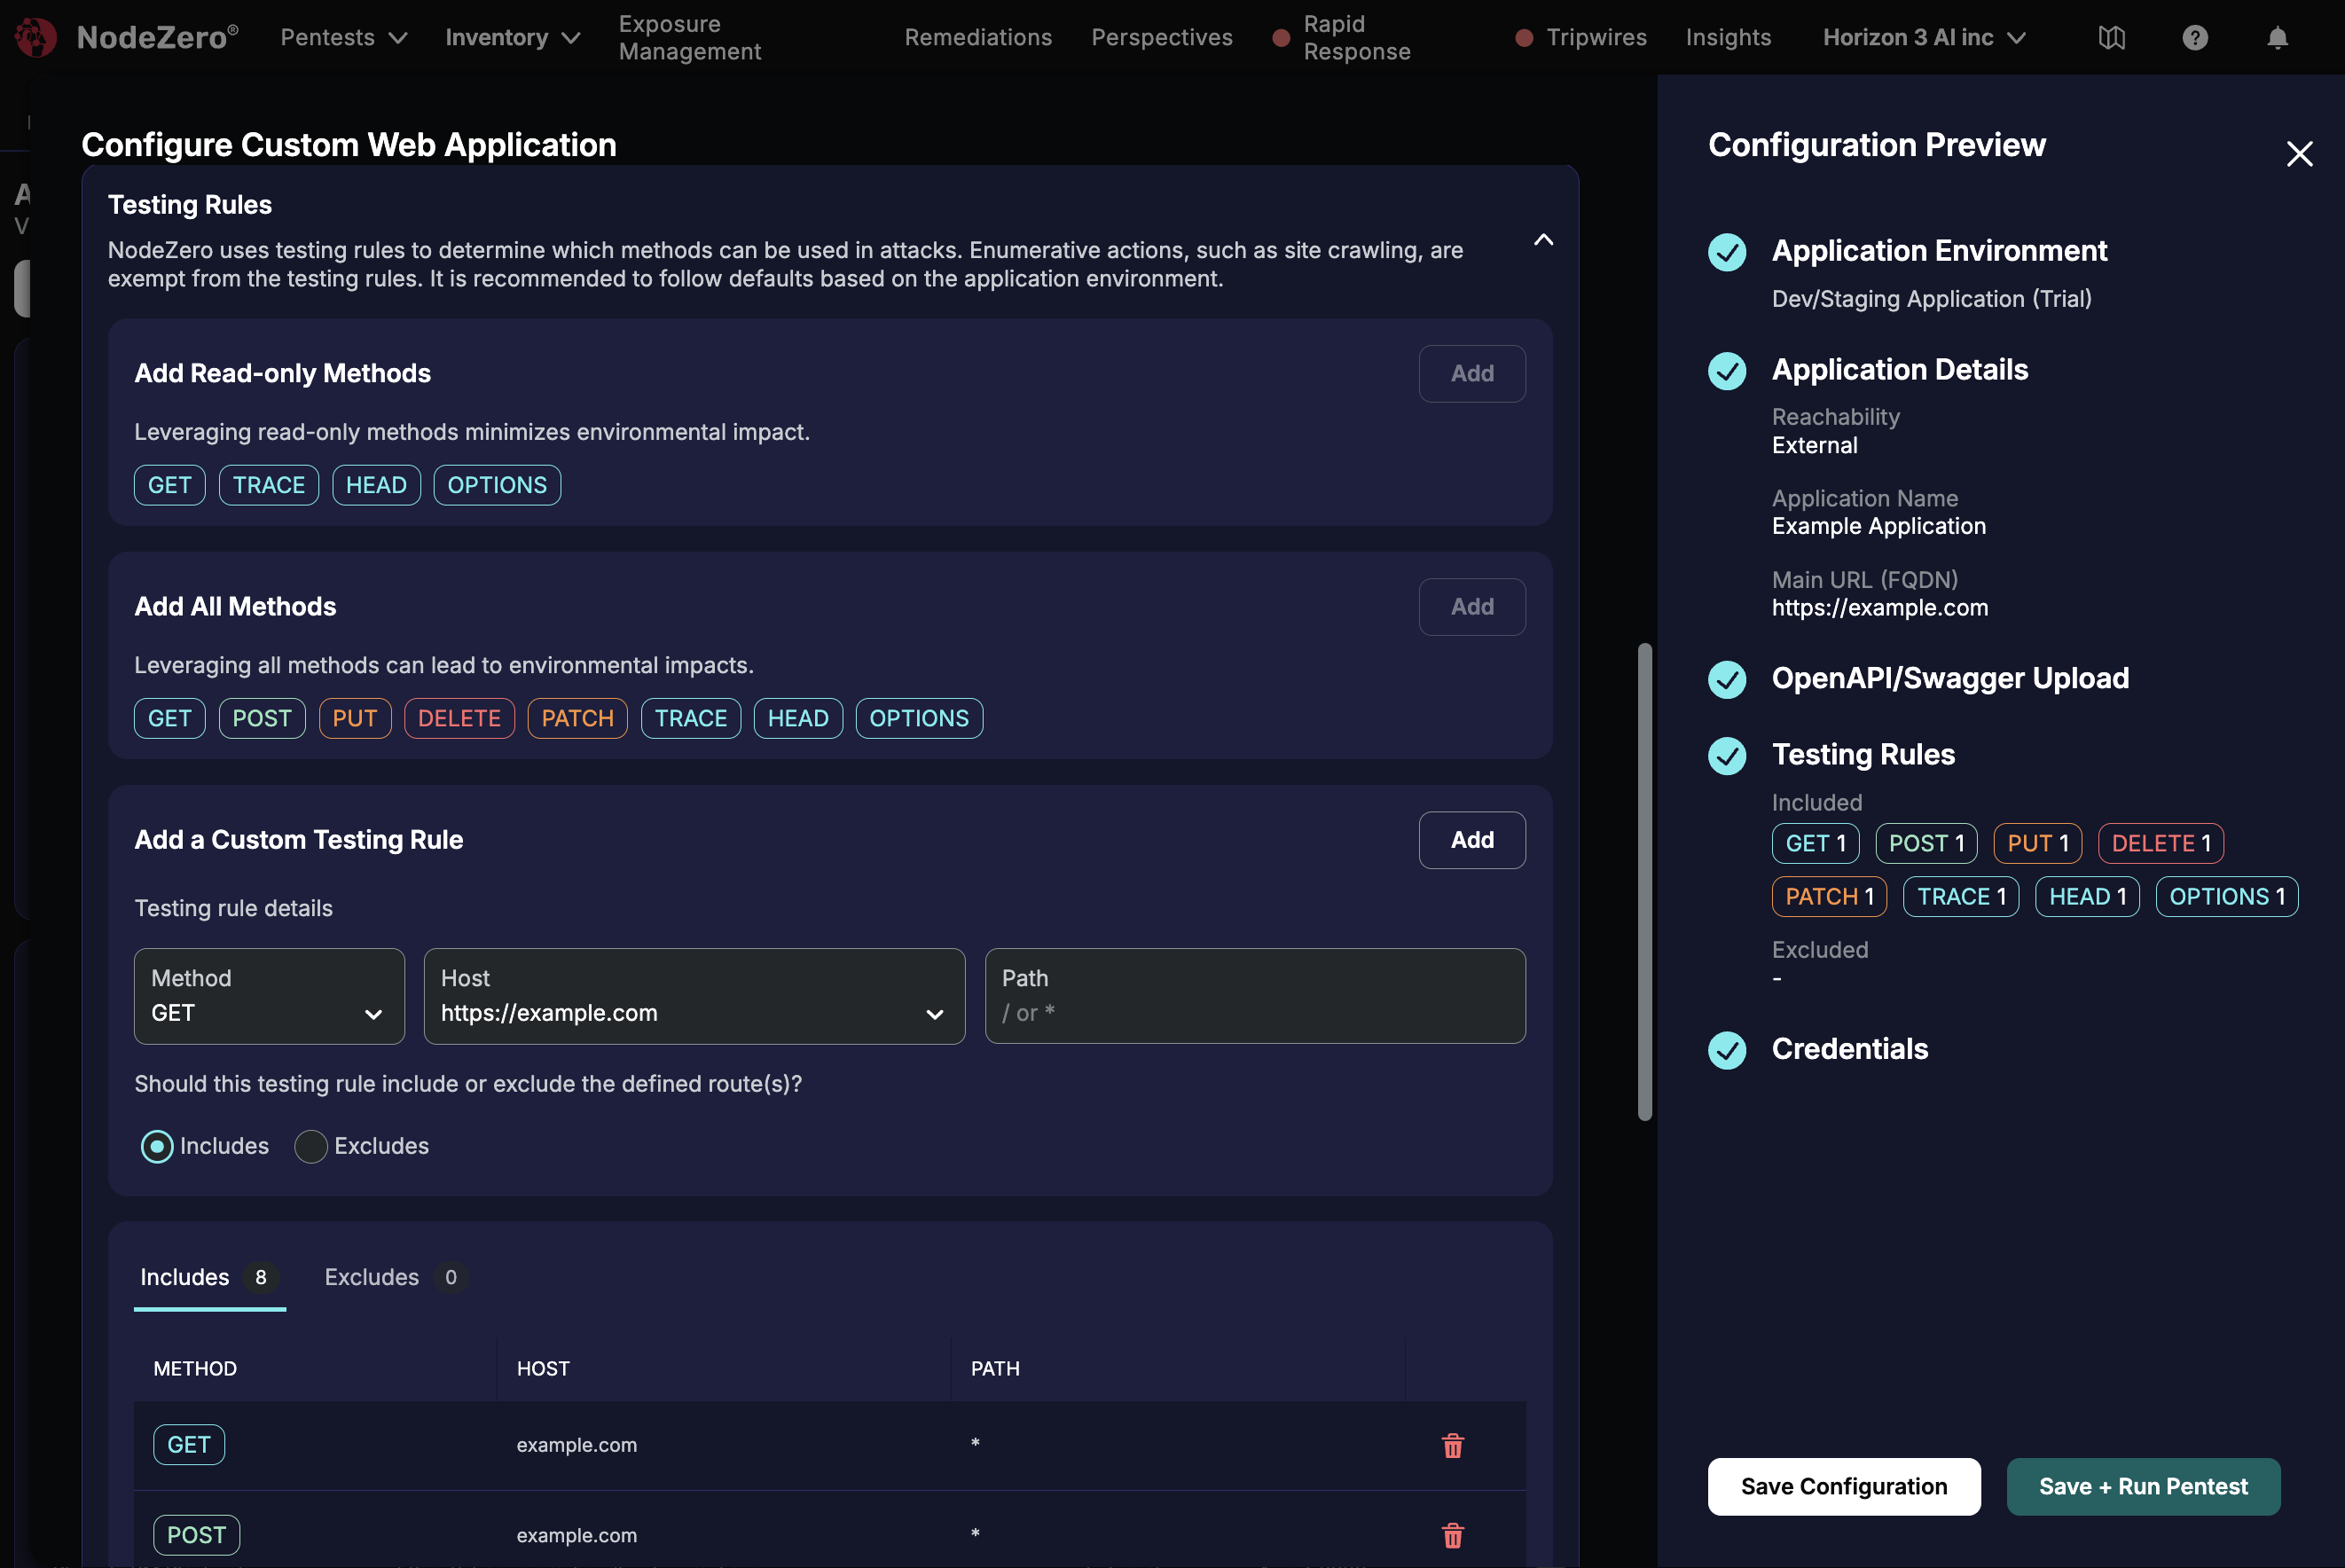
Add Read-only Methods – Adds rules for GET, TRACE, HEAD, and OPTIONS. Use for conservative testing with minimal impact. (Selecting a Production environment automatically inserts these methods as Includes.)
-
Add All Methods – Adds include rules for GET, POST, PUT, DELETE, PATCH, TRACE, HEAD, and OPTIONS. Use for thorough testing across all request types. (Selecting a Dev/Staging environment automatically inserts this complete set of methods as Includes.)
-
Add Read-only Methods – Adds rules for GET, TRACE, HEAD, and OPTIONS. Use for conservative testing with minimal impact. (Selecting a Production environment automatically inserts these methods as Includes.)
-
Add All Methods – Adds include rules for GET, POST, PUT, DELETE, PATCH, TRACE, HEAD, and OPTIONS. Use for thorough testing across all request types. (Selecting a Dev/Staging environment automatically inserts this complete set of methods as Includes.)
-
Add a Custom Testing Rule – Here, you can specify an HTTP method, host URL, and route pattern. Then set the rule to Include or Exclude (see the next section), and click Add. Custom rules serve use cases like excluding a specific route from testing, or preventing a specific method from executing against a specific host.
Include Versus Exclude Rules
When NodeZero matches routes, exclusion rules take precedence over inclusion rules. Horizon3 therefore recommends that you set general rules as Includes. Then set specific exceptions as Excludes.
You can use the tabbed table at the bottom of the Testing Rules section to remove rules from each category.
Choosing Methods
The HTTP request methods available within Testing Rules determine what kind of request NodeZero sends to each discovered route.
| Method | Meaning | What it does in testing |
|---|---|---|
| GET | Retrieve a resource | Loads pages or API data. It can test URL/query-string inputs, such as reflected XSS, open redirects, or LFI. It normally does not modify state, although poorly designed applications may cause side effects. |
| HEAD | Like GET, but without the response body | Checks whether a resource exists and inspects headers, status codes, redirects, and server behavior with less traffic. |
| OPTIONS | Ask what communication methods or capabilities are supported | May reveal allowed methods through the Allow header and is also used for CORS preflight behavior. It is generally non-destructive. |
| TRACE | Diagnostic loopback request | Asks the server to echo the request back. This can reveal whether TRACE is enabled and whether request headers—potentially including sensitive ones—are reflected. It is usually disabled on secure servers. |
| POST | Create a new resource or submit data | Submits form fields, JSON bodies, or file uploads for processing. Tests injection vulnerabilities (SQLi, XSS, SSTI) in submitted data, and can create persistent artifacts—such as new accounts or records—since it changes application state. |
| PUT | Replace an existing resource in its entirety | Overwrites a resource with a full new representation. Tests whether the application properly authorizes and validates replacement requests, since a missing check can let an attacker overwrite another user's data. |
| PATCH | Apply a partial update to a resource | Modifies specific fields of a resource rather than replacing it. Tests for the same authorization and input-validation gaps as PUT, typically at a finer, field-level granularity. |
| DELETE | Remove a resource | Requests deletion of a resource. Tests for broken access control that would let an attacker delete data they shouldn't be able to. Because it destroys data, it's typically the most tightly controlled method in a test configuration. |
How Methods Determine Results
The read-only methods (GET, HEAD, OPTIONS, and TRACE) are pre-populated as the safer method set for production-oriented testing. These are the safest defaults because they are typically non-destructive.
These methods provide useful reconnaissance and limited vulnerability coverage, but they do not exercise request bodies or state-changing workflows. So if you enable only these methods, NodeZero generally cannot perform actions that require POST, such as submitting login or registration forms.
A test limited to the read-only methods is primarily checking readable routes, metadata, server capabilities, diagnostic behavior, and some URL-based weaknesses. It is not testing the full attack surface of an authenticated or stateful application.
For broader coverage, Add All Methods includes methods such as POST, PUT, PATCH, and DELETE alongside the safer methods.
What Testing Rules Don't Affect
Site crawling and enumeration (route discovery) do not depend on testing rules. A discovered route with no matching rule might still appear in crawl results, but it is not eligible for attack testing.
Route coverage is not the same as vulnerability coverage: a route in scope might still be untestable or only partially testable because of various runtime prerequisites – authentication, method, parameter, rate limiting, etc.
Configure Credentials
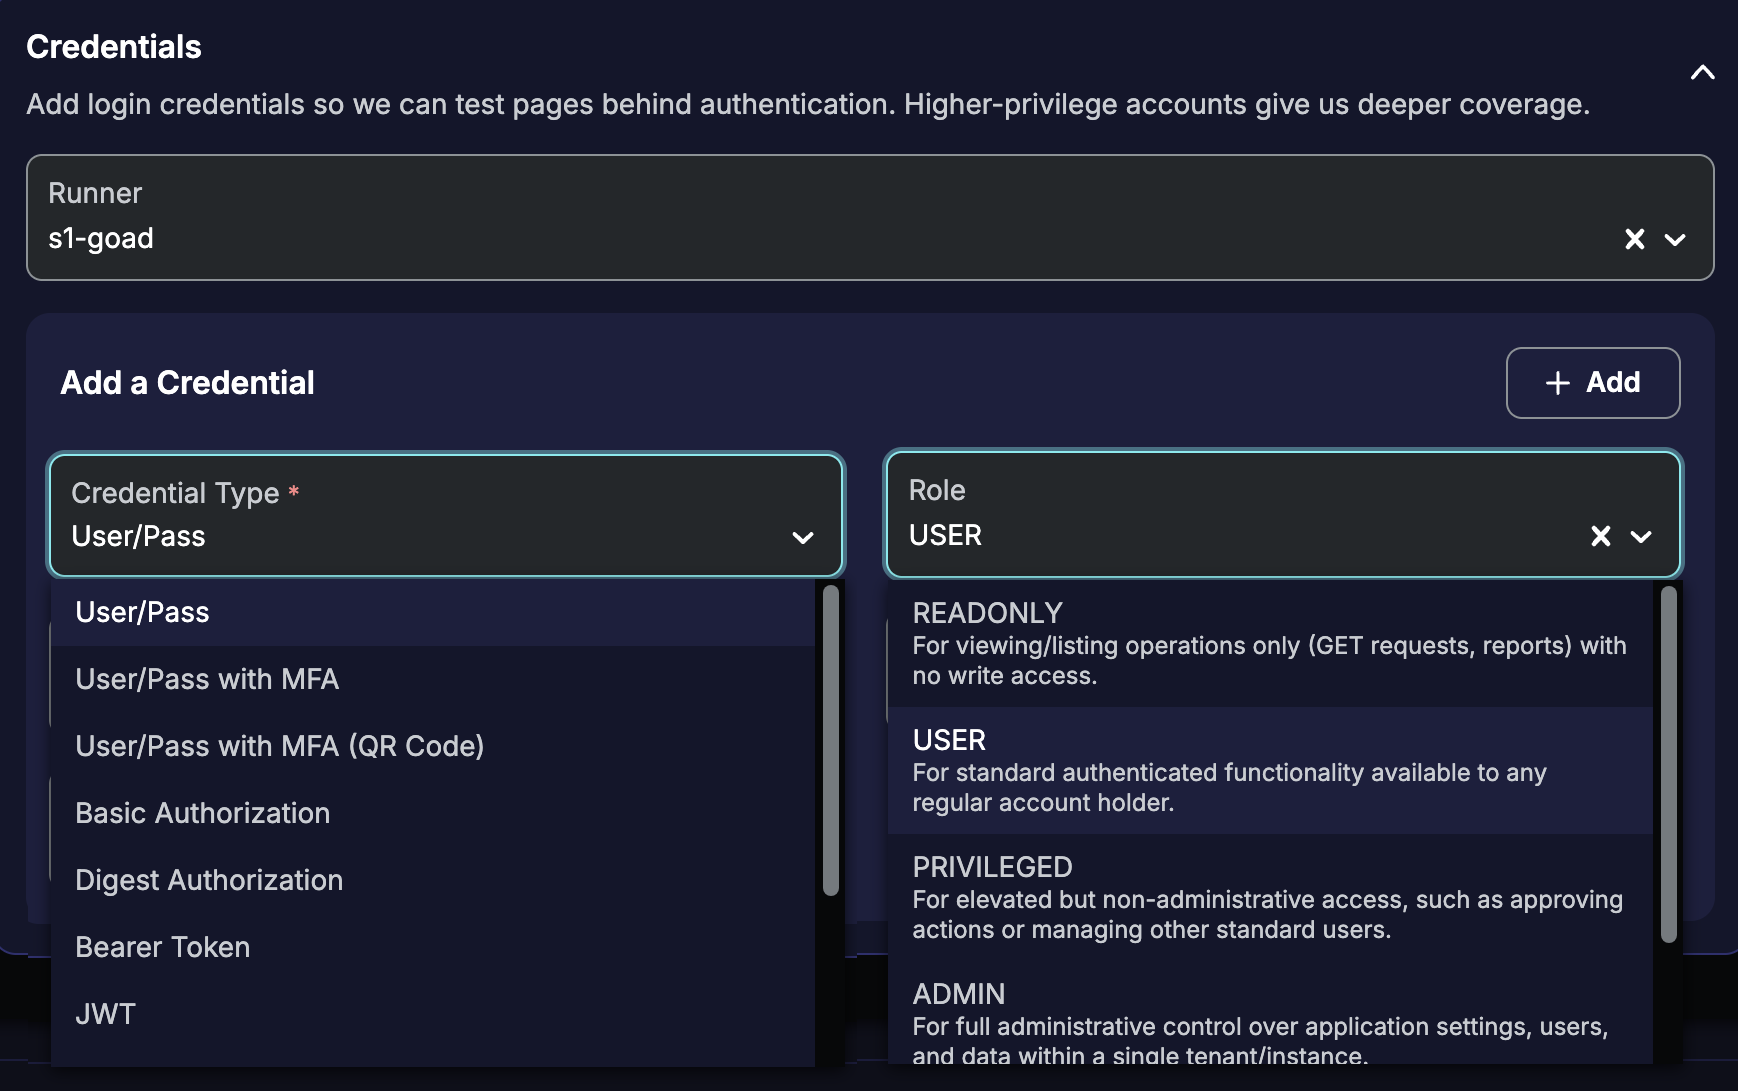
Add credentials to your web application's definition here. When you later run each pentest against this target, you can apply any of these credentials.
Credentials rely on Runners
To add credentials, you must select a Runner that can reach the target application. Make sure your Runner is upgraded to the November 2025 version or later.
Each credential entry includes:
- Credential Type – The authentication method: username/password, bearer token, session cookie, or API-key header. With all
User/Passoptions, NodeZero will attempt a browser-based login. The other options are token-based. We support SSO providers. We support TOTP-based MFA (Time-based One-Time Passcode, Multi-Factor Authentication), using authenticator apps, uploaded QR (Quick Response) code images, or backup codes. - Role – A label for the account's privilege level (for example,
USERorADMIN). Use distinct roles when testing with multiple accounts, to support access-control testing. Horizon3 recommends adding at least two roles, so that you can test each account's ability to access the other’s data. We require at least two roles to perform certain test techniques, such as Broken Access Control and IDOR (Insecure Direct Object Reference). - SSO Provider – Optionally (where applicable), specify the SSO provider when the credential authenticates through Entra, Okta, Auth0, PingID, Keycloak, or a compatible custom login flow.
- Username and Password – Or email address and password; required for username/password credential types.
- Custom Field Name and Value – Add any extra field name/value pairs required to match the target application's authorization flow. Each field name should exactly or closely match the target app. (E.g., entering
EMPLOYEEIDorEmployee_idshould allow NodeZero to match a field labeledEmployee ID.)
Higher-privilege accounts give NodeZero deeper coverage of authenticated routes and access control boundaries. For further details, see WebApp Authentication.