Okta
Warning
This guide should be used as a functional example only. Identity Admins should follow their Company's policies and best practices when implementing Single Sign-On (SSO).
Similarly, because these guides are for services Horizon3 does not control, screenshots and configuration options may be different then what you see here.
All sections of this page should be completed by someone with the Identity Team Admin Persona
Create Okta App Integration
Log into your Okta Admin Console, browse to the Applications section, and click Create App Integration.

In the "Create a new app integration" form, select OIDC - OpenID Connect as the Sign-in method
and then Web Application as the Application Type.
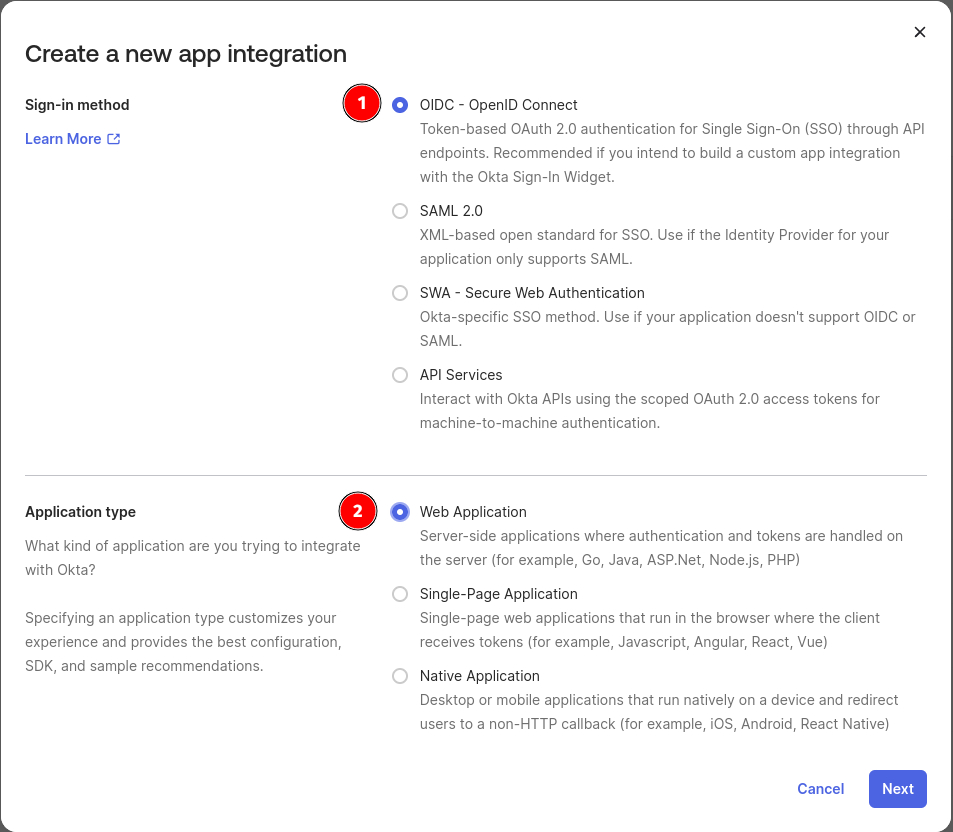
Click Next. Use the information in the below table to fill out the "New Web App Integration" page. Be sure to select the correct tab based on which regional Portal your users access.
| Field | Value |
|---|---|
| App integration name | NodeZero Portal |
| Logo | H3 Logo |
| Grant Type | Authorization Code |
| Sign-in redirect URIs | https://portal.horizon3ai.com https://auth.horizon3ai.com/oauth2/idpresponse |
| Assignments | Limit access to selected groups OR Skip group assignment for now |
| Field | Value |
|---|---|
| App integration name | NodeZero Portal |
| Logo | H3 Logo |
| Grant Type | Authorization Code |
| Sign-in redirect URIs | https://portal.horizon3ai.eu https://auth.horizon3ai.eu/oauth2/idpresponse |
| Assignments | Limit access to selected groups OR Skip group assignment for now |
Note about Groups
If you set Assignments above to "Limit access to selected groups", you will need to add the Okta groups that should be assigned the app in order to save your settings.
Portal does not pull groups or roles from the IdP so they cannot be used for providing access via Portal.
Click Save. Your page should refresh and you should be on the app console for your newly create app!
Gather Info
Under the Client Credentials section, copy the Client ID.
Under the Client Secrets section, copy the Secret.
Copy your Issuer URL. This is most often your
okta domain. Include the https:// prefix when submitting the Issuer URL
Provide the Client ID, Client Secret, and Issuer URL to your Portal Org Admin so they can configure the SSO Provider in Portal. After the SSO Provider has been set up, your Portal Org Admin will need to provide you the Initiator URL value so you can complete the app configuration.
Edit Login Settings
Initiate login URI
You will need the Initiator URL value from your Portal Org Admin before you can proceed with this section.
This is the value of the "Initiator URL" returned when the Org Admin creates the SSO Provider in Portal.
In the Okta Admin console, browse to your recently created "NodeZero Portal" app.
Scroll down to the "General Settings" section and click the Edit button.
Under the "General Settings > Login" section set the "Sign-out redirect URIs" to your Issuer URL. This is most often your okta domain.
Under the "General Settings > Login" section click the Login initiated by dropdown menu and select "Either Okta or App". This
should cause the Application visibility and Login flow fields to appear.
For the Application visibility field, check only the box for "Display application icon to users".
For the Login flow field, select the "Redirect to app to initiate login (OIDC Compliant)" option.
For the Initiate login URI field, enter the value of the "Initiator URL" provided by your Portal Org Admin.
Click Save.
You can now assign this app to users. When you do, they should see a "NodeZero Portal" tile in their Okta App Dashboard and Okta Browser Plugin. Clicking it should log the user into Portal.