Phishing Impact Test
The NodeZero® Phishing Impact Test is designed to help you measure and understand the impact of successful phishing attack within your organization, starting with your most phish-prone employees.
Why should I run a NodeZero Phishing Impact Test?
No matter how secure we make our network perimeter, attackers will find ways to exploit the humans that use our networks to gain initial access. Hopefully, your organization provides education and training to employees to reduce the likelihood of successful phishing attacks, but inevitably some slip through the cracks.
So the question is not "what happens if someone gets phished?", but "what happens when someone is phished?".
This is where NodeZero's Phishing Impact Tests come in!
This test is intended to supplement your organization's simulated phishing tools to not just identify who my be susceptible to phishing, but to also understand what happens when they get phished.
NodeZero will automatically capture the credentials of simulated phishing attack victims and use them to pentest your internal network. The report from this test can be use to assess the business risk of a successful phishing attack, and identify security controls that can be put in place to mitigate this risk.
How does a NodeZero Phishing Impact Test work?
The Phishing Impact Test works a lot like an Internal Pentest, but enables NodeZero to automatically capture and use credentials captured through your organization's Phishing Simulation Tool.
At a high-level:
- NodeZero is deployed within your organization's network
- NodeZero generates a JavaScript payload to be copied into the landing page for your simulated phishing campaign
- You deploy your simulated phishing campaign, sit back, and wait for a bite
- When a user is phished, the credentials are captured and directly injected into NodeZero's ephemeral infrastructure
- NodeZero uses the phished credentials for perform an authenticated pentest within your network
- NodeZero generates a report to convey the impacts of the phishing attack
How to Run a NodeZero Phishing Impact Test
0. Before You Begin
- You will need access to both the NodeZero Portal and your organization's Phishing Simulation Tool (e.g. KnowBe4, ProofPoint, etc.)
- Plan out the details of your phishing campaign
- How long will the campaign last?
- What is the target group for this phishing campaign?
- What type of phishing email(s) am I sending?
- What landing page(s) will the phishing emails link to?
Campaign Duration
NodeZero currently supports phishing campaigns up to 28 days.
1. Create a new Pentest
Open the NodeZero Portal and navigate to the Pentests tab.
Click + RUN PENTEST, then select the Operational Scenario Testing category.

Select Phishing Pentest to open the configuration for this pentest.

2. Configure the Phishing Impact Test
The pentest configuration for a Phishing Impact Test is very similar to an Internal Pentest
A key difference from the Internal Pentest is that you must set a minimum phishing campaign runtime. This should be at least as long as your phishing campaign within your Phishing Simulation Tool.

Tip
Consider your phishing targets when configuring your pentest scope. Include networks in which your phishing targets likely have access. Also consider including networks to which they definitely should NOT have access. NodeZero can help validate if your assumptions and security controls are correct.
3. Deploy NodeZero
Run the curl script on your NodeZero host to kick off the Phishing Impact Test. Or, if you are using a NodeZero runner, the test will begin automatically.
Don't have a NodeZero host?
See our documentation in Setup NodeZero Host.
This script will validate the Docker installation, download the most up-to-date NodeZero Docker image, and begin the test.
4. Configure the Phishing Landing Page
4.1 Copy NodeZero Phishing Script and embed at the bottom of the HTML
The NodeZero Phishing Script should be copied to the bottom of the HTML file right above the closing </body> element. In some cases phishing templates are missing the <body> tag. In such cases putting the script at the bottom on the HTML will suffice.
The example HTML page below shows where to paste the script, and can be used to try it out yourself.
<!DOCTYPE html>
<html lang="en">
<head>
<meta charset="UTF-8">
<meta name="viewport" content="width=device-width, initial-scale=1.0">
<title>Horizon3.ai Phishing Impact Test Page</title>
</head>
<body>
<style type="text/css">
* { box-sizing: border-box; }
body { font-family: "Helvetica Neue"; font-size: 15px; color: #000; }
h1 { font-size: 34px; color: #000; font-weight: 200; }
form { width: 100%; max-width: 356px; margin: 0 auto; display: block; }
input[type="text"],input[type="password"] { border: 2px solid rgba(0, 0, 0, 0.4); background-color: rgba(255, 255, 255, 0.4); color: #000; font-size: 15px; padding: 6px 8px; margin-bottom: 12px; }
input[type="text"]:focus, input[type="password"]:focus { border-color: #0078d7; background-color: #fff; }
input[type="text"], input[type="password"], input[type="submit"] { width: 100%; }
#logon { background-color: #0078d7; border: 0; color: #fff; padding: 8px 12px; text-align: center; width: 100%; font-size: 15px; }
#logon:hover { background-color: #004e8c; cursor: pointer; }
</style>
<center>
<img alt="Horizon3.ai logo." height="25" src="https://p7i3u3x3.rocketcdn.me/wp-content/uploads/2022/06/Horizon3ai_Logo_Tagline_Horizontal_RGB-WhiteTxt.png.webp" style="width: 200px; height: 50px; margin: 2% auto 0 auto; background-color: #000;" width="100" />
<h1>Sign in</h1>
<p>Use your Horizon3.ai account.<br /></p>
<form action="/pages/19906e20e8a60c71badf8f94151c19a2" id="loginform" method="post">
<input id="username" name="username" placeholder="Email" required="" type="text" />
<input id="password" name="password" placeholder="Password" required="" type="password" />
<input id="logon" name="logon" type="submit" value="Sign in" />
</form>
</center>
<!-- PASTE NODEZERO PHISHING SCRIPT HERE -->
</body>
</html>
Some phishing templates may already contain JavaScript and there could be interference between the scripts. Carefully review any existing scripts to identify conflicts. Remove any unnecessary <script> tags in the template. In most cases, the only <script> tag should be the NodeZero Phishing Script.
4.2 Preview the landing page
Open the landing page to preview and test it. Notice that there is a red banner explaining Horizon3.ai Phishing Impact test mode enabled. If you do not see a red banner check the script for const testModeEnabled = true.
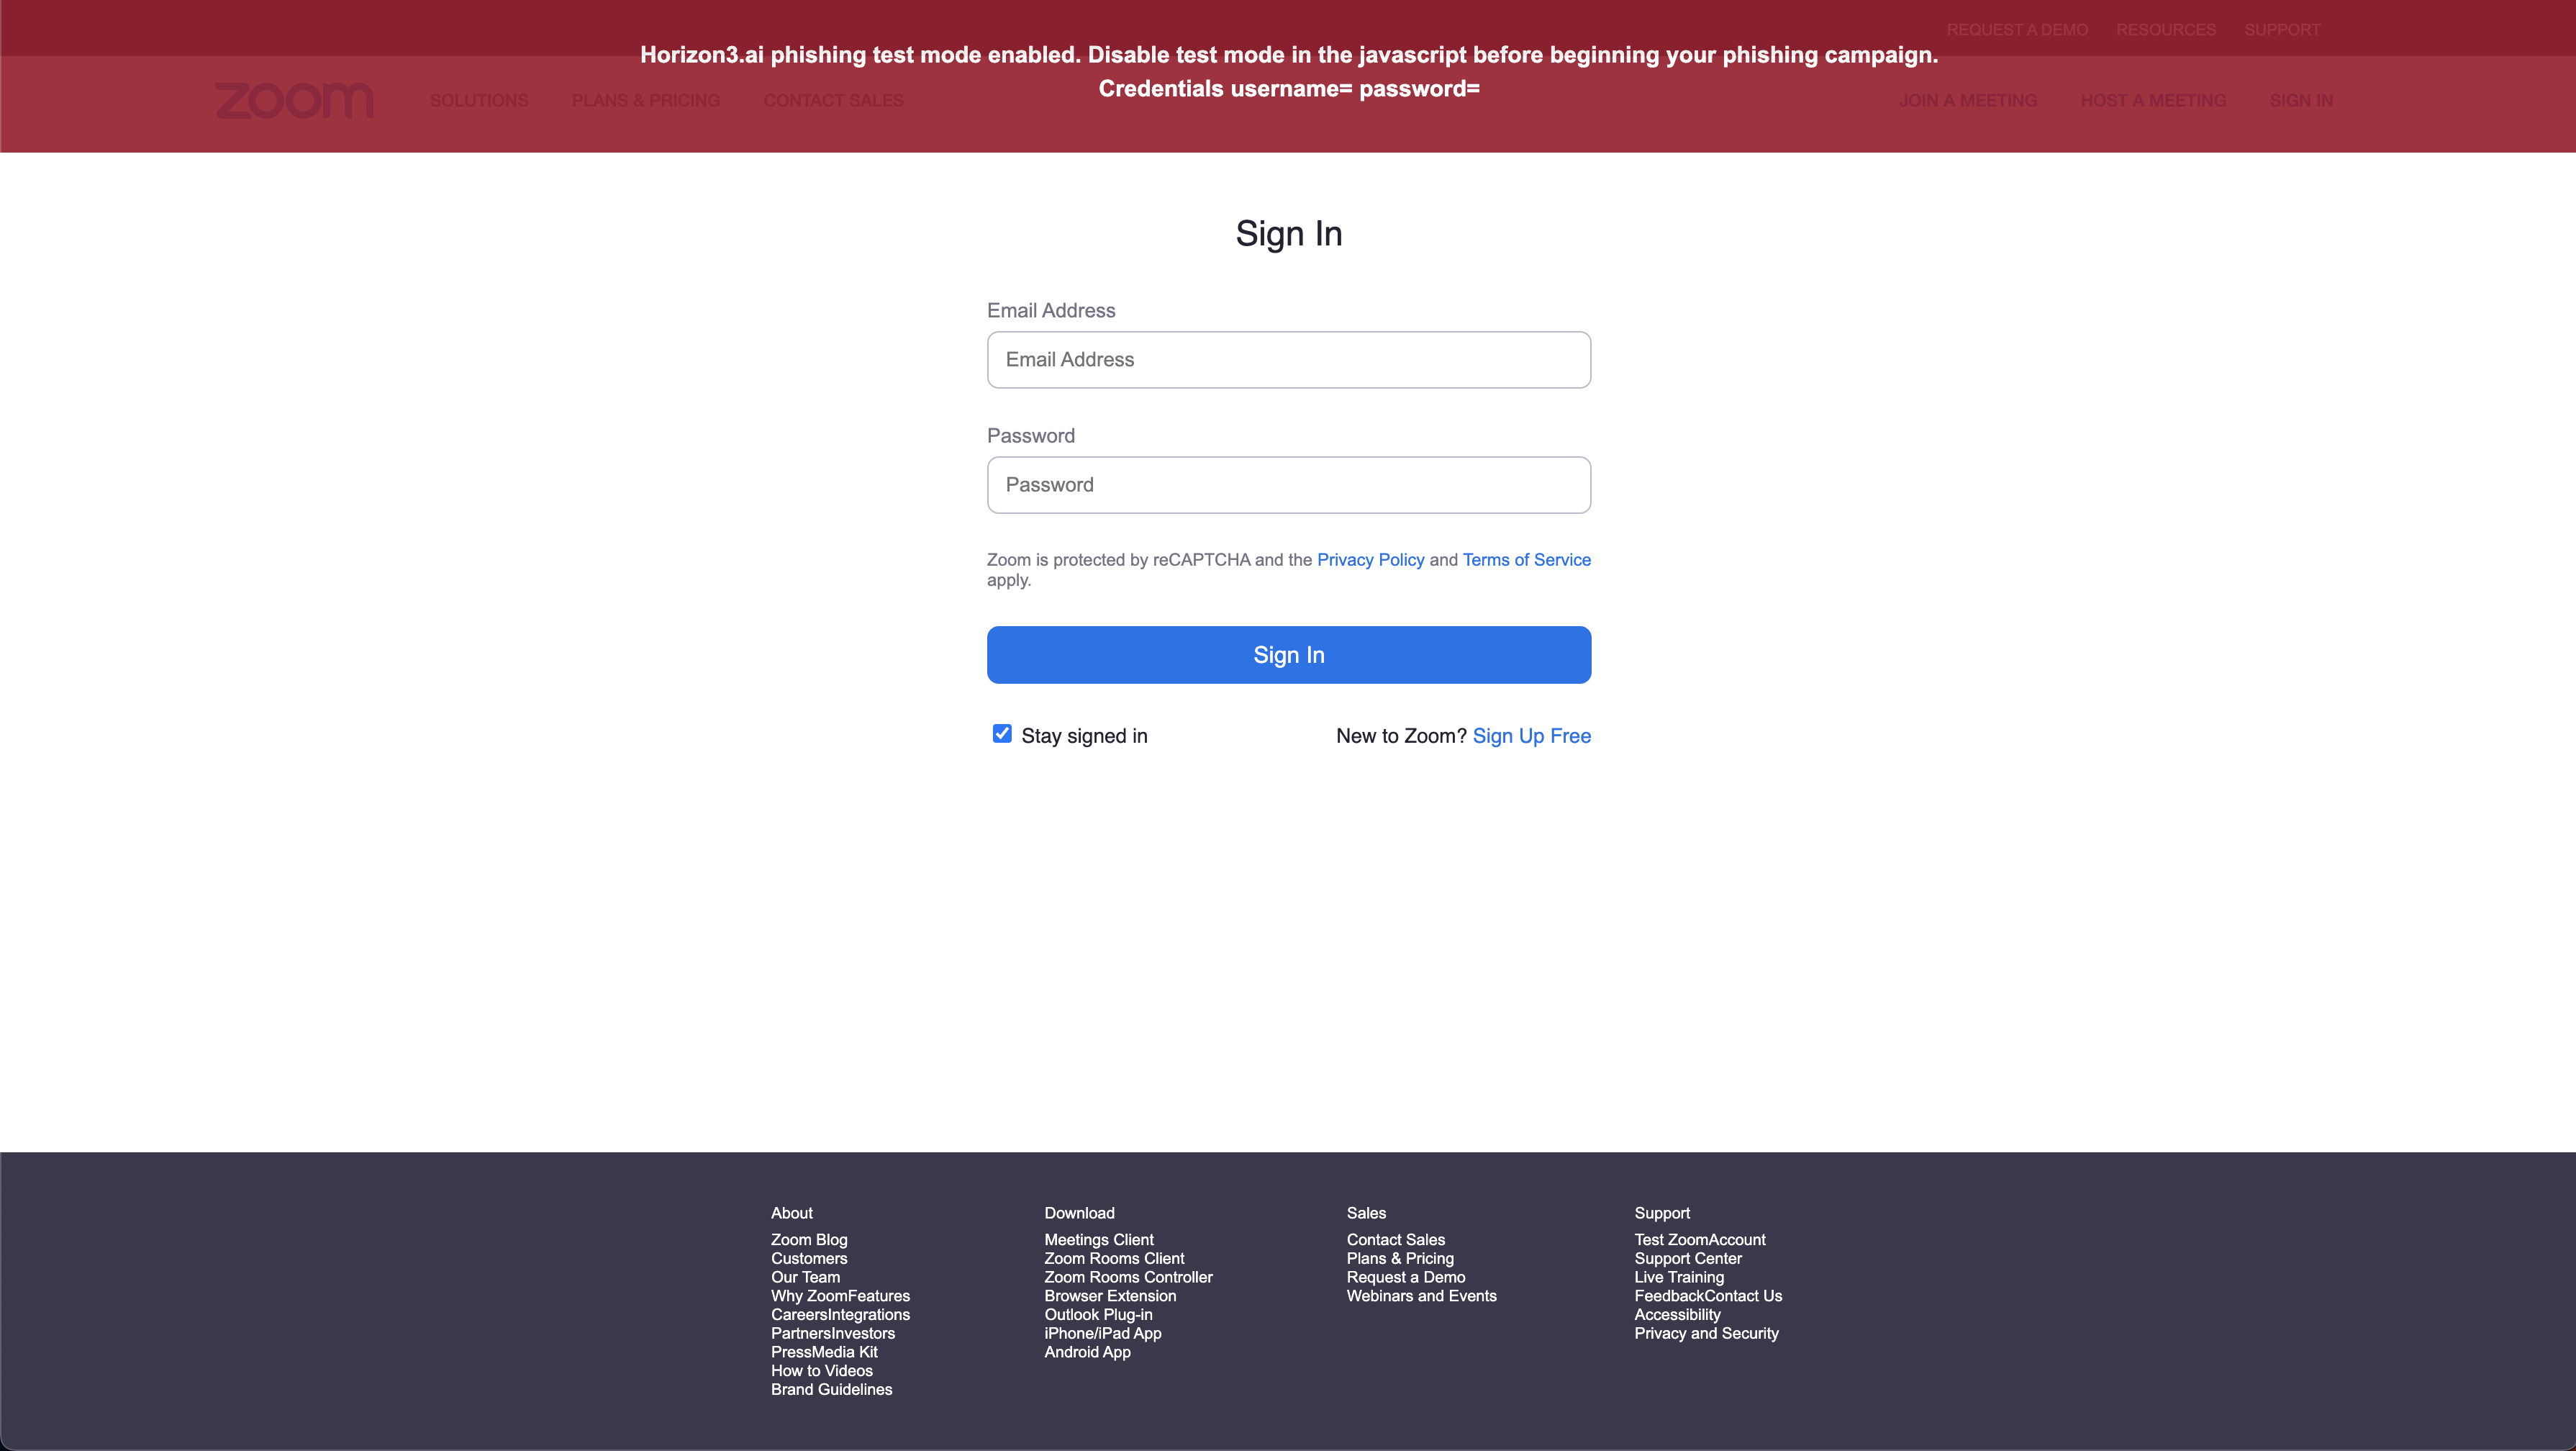
4.3 Test the landing page credential detection
From the landing page preview, enter a username and password. The credentials will be reflected to you in the red test banner as you type.
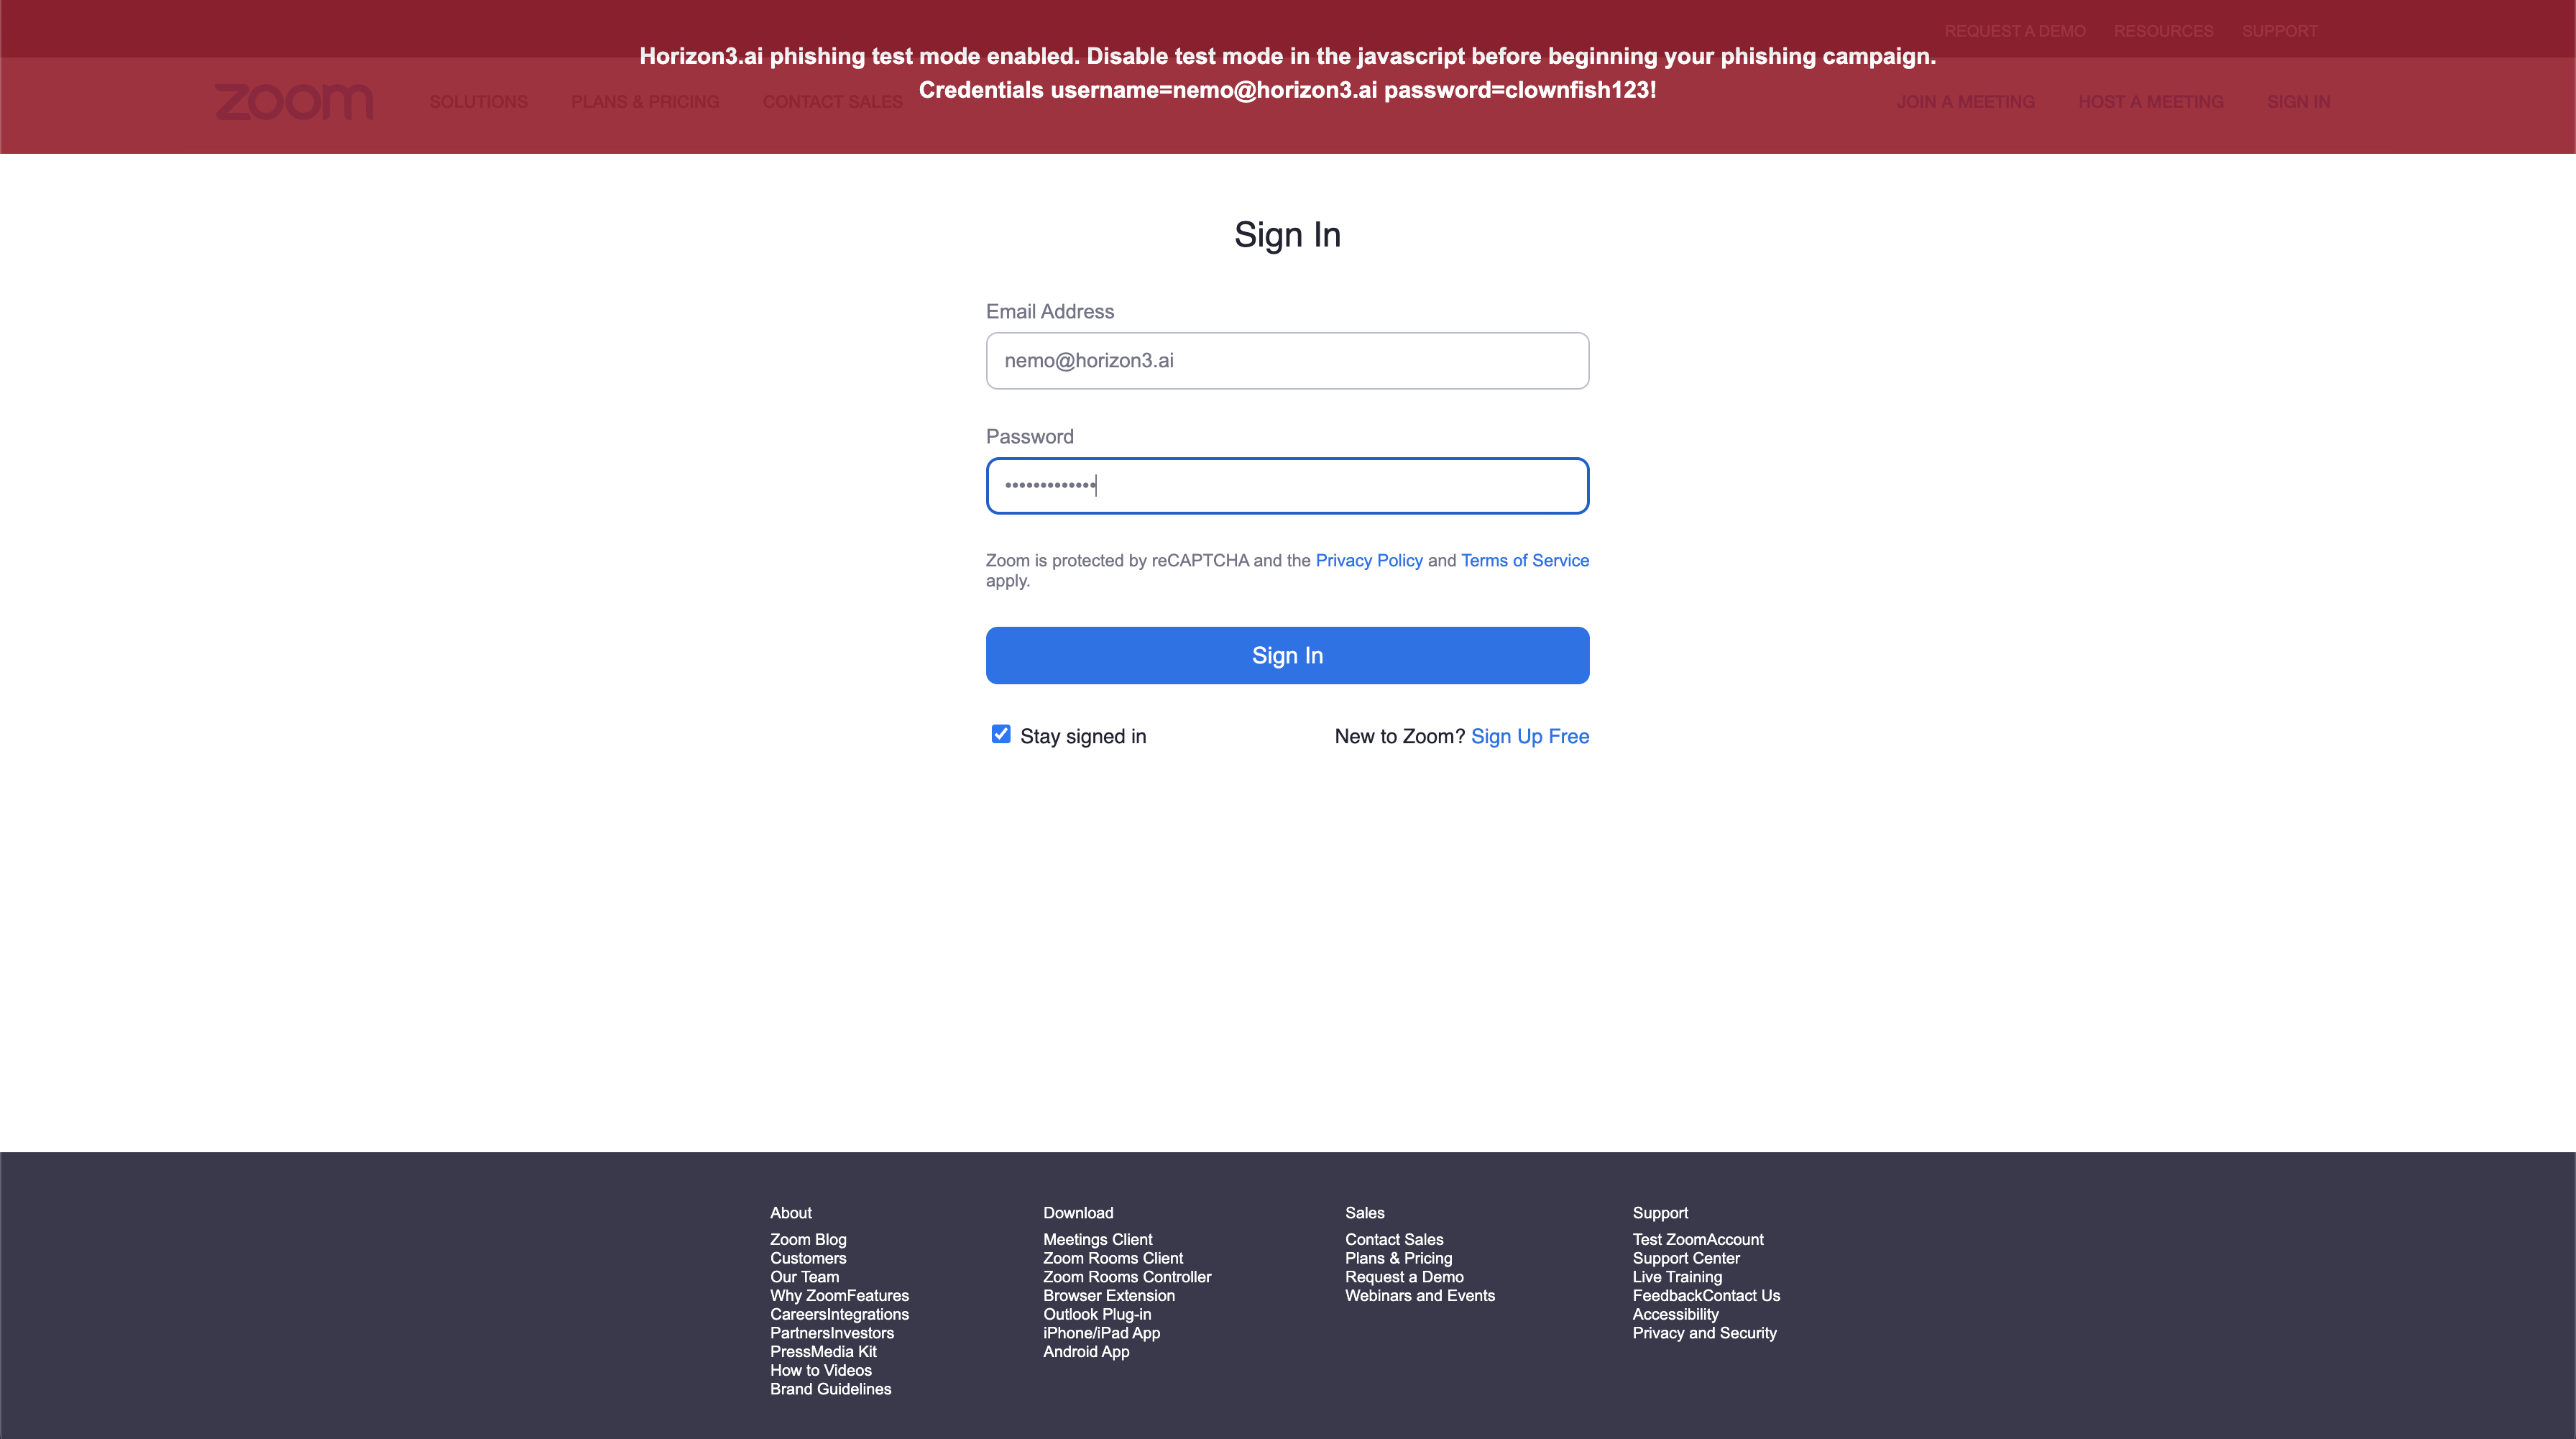
If you do not see credentials when typing into the input fields, then there is an issue with the script identifying the right inputs.
4.4 Test the landing page credential submission
From the landing page preview, submit a set of credentials. If the script is working properly the banner will turn green. At this point, you have validated that the script is correctly capturing and submitting credentials to NodeZero.
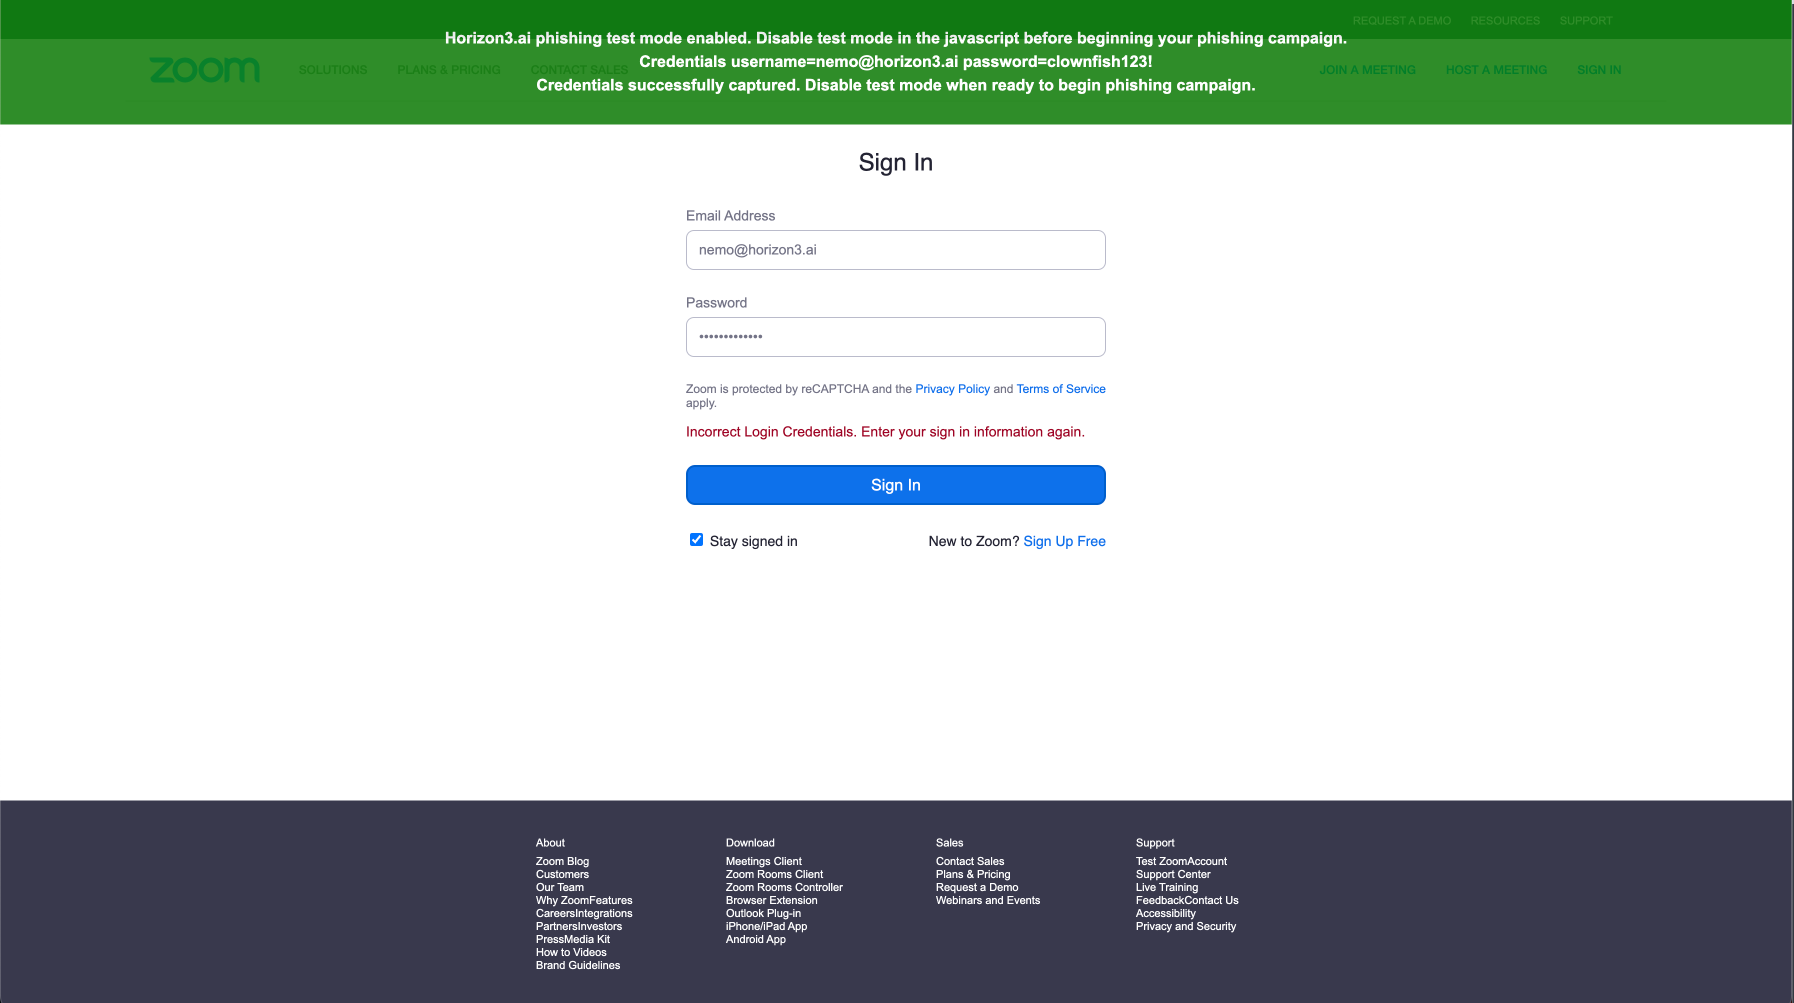
Additionally, you may notice a red form validation error that reads Incorrect Login Credentials. Enter your sign in information again. This is added by the Horizon3.ai phishing script in an attempt to trick the user into submitting another variation of credentials that can also be used during the Pentest. You can disable this feature if you like by changing the following variable to false const showIncorrectCredentialsError = false.
4.5 Disable test mode
Revisit the landing page source code and change the line
const testModeEnabled = true
with
const testModeEnabled = false
Refresh the landing page preview and ensure that the banner is no longer present. If you do not change this variable, then the red banner will show to phished users.
Your landing page is now armed and ready for your phishing campaign.
Having issues with the NodeZero Phishing Script?
See our documentation in How to use the NodeZero Phishing Script.
5. Launch your Phishing Campaign
Launch the Phishing Campaign in your Phishing Simulation Tool.
As phished credentials are received, they will appear in Real-Time View and automatically be used by NodeZero.
You can view the status of credentials in the Real-Time View using the icons next to each credential. Credentials states are shown below:
| Icon | State | Description |
|---|---|---|
| Pending | The phished credential has been submitted but has not yet been received by NodeZero. This state may occur when the pentest first receives the credential. | |
| Received | The phished credential has been received by NodeZero. If NodeZero has attempted to use the credential but authentication was unsuccessful, it will remain in the Received state. | |
| Confirmed | The phished credential has been used by NodeZero to successfully authenticate within the target environment. |
FAQ
Is it safe to send phished credentials to NodeZero?
Yes. Horizon3 takes the security of phished credentials seriously.
Once phished, credentials are securely transferred to NodeZero's ephemeral environment, which is dedicated to a single pentest and is destroyed once the pentest is completed. Sensitive parts of credentials (e.g. plaintext passwords, hashes, private keys, etc.) are never stored in persistent databases.
How many credentials can I phish in a single Phishing Impact test?
NodeZero supports phishing up to 100 total credentials per Phishing Impact test. Credentials that exceed this limit may show up in the user interface but will not be used by NodeZero. If you find that your Phishing Impact tests are exceeding this limit, consider reducing the number of emails in your phishing campaign or reach out to support to discuss a limit increase.